|
Analog TVs and VCRs can receive digital television (DTV) broadcast signals by using a “Digital-to-Analog Converter Box” that can be purchased at retail stores. If you use a single converter box and Set-Up #1, you can watch and record one channel at a time. If you use two converter boxes and Set-up #2, you can watch one channel while recording a different channel. |
|
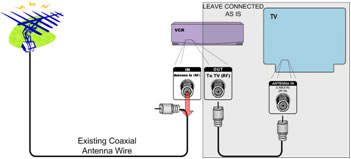
Set-up #1: Watch and Record One Channel at a TimeSupplies: You will need your analog TV, analog VCR, the antenna you have been using (indoor or outdoor), and the coaxial wire that currently connects your antenna to your VCR (as pictured on the right). Your new Converter box will come with a second coaxial wire and a remote control. Before you begin, you should unplug the power from your TV and VCR. |
 |
|
Step 1. Unplug the existing coaxial antenna wire from your VCR “Antenna In (RF)” port. Leave your connection from the VCR to the TV as is (either an A/V cable or Coaxial Wire). |
 |
|
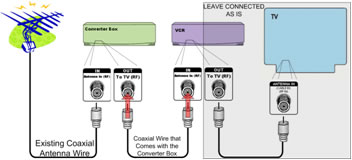
Step 2. Plug the existing coaxial wire into the “Antenna In (RF)” port on your Converter Box. |
 |
|
Step 3. Using the coaxial wire that comes with your Converter Box, plug one end into the “Out To TV (RF)” port on the Converter Box. Plug the other end into the “Antenna In (RF)” port on your VCR. |
 |
|
Step 4. Plug the power cords on your Converter Box, VCR and TV into a power outlet, and turn the devices on. Tune your VCR to channel 3 or 4 (follow the instructions in the converter box manual), and set your TV to display video from your VCR. Using the remote that comes with your Converter Box, follow the on-screen set-up guide to scan for available DTV channels, and begin enjoying the benefits of Digital Television! You will be able to record programming on the channel you are tuned to on your converter box. |
|
Set-up #2: Watch One Channel while Recording a Different Channel
|
Supplies: You will need your analog TV, the antenna you have been using (indoor or outdoor), the coaxial wire that currently connects your antenna to your TV (as pictured on the far right), four additional lengths of coaxial wire, a set of A/V cables (as pictured on the right), a 2-way splitter, and two converter boxes. Your new Converter boxes will each come with a coaxial wire, a set of A/V cables (three wires with red, white and yellow plugs), and a remote control. Before you begin you should unplug the power from your TV and VCR. |
|


|
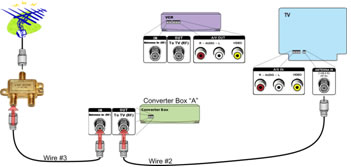
Step 1. Unplug the existing coaxial antenna wire from your VCR “Antenna In (RF)” port. Step 2. Unplug coaxial wire #2 from your VCR “To TV (RF)” port. Leave the other end of wire #2 plugged in to the TV. |
 |
| Step 3. Plug the existing coaxial antenna wire into the “In” port on your 2-way splitter. |  |
| Step 4. Plug the loose end of wire #2 into the “Out to TV (RF)” port on Converter Box “A”.
Step 5. Plug one end of coaxial wire #3 into one of the “Out” ports on the 2-way splitter. Plug the other end into the “Antenna In (RF)” port on Converter Box “A”. |
 |
| Step 6. Plug one end of coaxial wire #4 into the other “Out” port on the 2-way splitter. Plug the other end into the “Antenna In (RF)” port on Converter Box “B”.
Step 7. Plug one end of coaxial wire #5 into the “Out to TV (RF)” port on Converter Box “B”. Plug the other end into the “Antenna In (RF)” port on your VCR. |
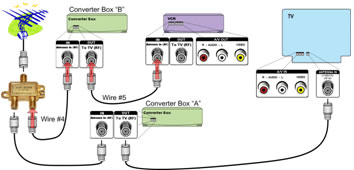 |
| Step 8. Using your set of A/V cables, plug one end of the cables into the “A/V Out” ports on your VCR. Match the colors of the plugs to the colors of the ports, so that red plugs into red, white into white, and yellow into yellow. Plug the other end of the cables into the “A/V In” port on your TV set in the same way. If your TV does not have a red (Audio R) port, leave the red cable unplugged on both ends. | 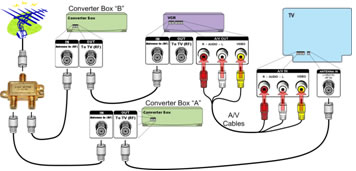 |
| Step 9. Plug the power cords on your Converter Boxes, VCR and TV into power outlets, and turn them all on. Tune your TV to channel 3 or 4 (follow the instructions in the converter box manual) to set up Converter Box “A”. Using the remote control that came with Converter Box A, follow the on-screen set-up guide to scan for available DTV channels.
Step 10. Set your TV to “Audio/Video In” and tune your VCR to channel 3 or 4 (follow the instructions in the converter box manual) to set up Converter Box “B”. Using the remote that came with Converter Box “B”, follow the on-screen set-up guide to scan for available DTV channels. |
|
- If you want to record a program with your VCR, set the channel on your VCR to channel 3 or 4, and tune the converter box to the desired channel.
- If your Converter Box includes a “universal remote control” or you already have your own universal remote control, follow the instructions that come with your Converter Box to program the remote to work for the TV, VCR and the Converter Box.
- If you have a DVD Recorder or DVR, you should be able to connect it in a manner similar to the steps outlined above.
For More Information
For more information about the DTV transition visit our DTV website.
Print Out
Digital-to-Analog Converter Box Setup With a VCR Guide (pdf)